Getting Started: 5 Steps to Get the Most Out of the Pure Customer Community
Welcome! You've taken the first step and created an account here. What to do next you ask? Here's five simple steps to take after registering to ensure you're getting the most out of this community. Fill out your Profile: Let the community know who you are! Click on your avatar in the top right corner of this window and select 'My Settings' from that dropdown. Fill in your name, location, and bio information. Plus select from one of several default avatars or upload your own image. Write an Introduction post: Head over to the Social Space and write your intro post. Tell us about yourself, your role at your company, and your goals for participating in this community. What have you been thinking about a lot lately at work? (And we won't shy away from pictures of your pets either!) Follow a couple of Forum areas: Find the products you use most and solution areas you're most focused on in our Forums and be sure to click the bell icon in the upper right of those forums to be sure you get notifications on the latest activity in those areas. If you work in Finance, Healthcare, Public Sector, or Telco there's groups dedicated to the unique needs of your industry areas too. And if you're an open source or automation fan, Cloud Native and Kubernetes devotee, or a Pure Partner, there's dedicated group you can join for each of those areas too. Join your local Pure User Group: Click on Groups in the top nav and select Pure User Groups. (fka FlashCrew) Select your region & find the group for your local area. Click on that group and then click 'Join Group'. This will ensure you hear about any Pure events happening in your local area, including when & where the next meetup is. Pick 3-5 tags to follow: This community makes heavy use of tags. As you browse a forum, you'll notice each thread has tags. That is because we require them for every post. Find the tags most relevant to your interest areas and click the bell icon on those pages so you can keep up to date with the latest posts in those categories, regardless of what forum or group the discussion happens in. Finally, feel free to ask questions! Your friendly admins (bmcdougall and Ludes) are here to answer any questions you have and take suggestions. And we have deputized experts across Pure Storage to be on hand to answer deep technical questions. So don't be shy, there's always someone around to help you out.3KViews18likes9CommentsCincinnati PUG Community; We Need Your Help!
"In the midst of chaos, there is also opportunity". These are the words of Sun Tzu who famously wrote The Art of War. While customers, partners, and Puritans all get acquainted to the rebrand from Pure Storage, to EverPure; it also provides us the opportunity to create a unique identity for our PUG chapter. And this is where we need your help. We know our community is filled with creative minds. And Cincinnati has many unique identities, from our beautiful skyline (and chili), to our sports teams (Reds, Bengals, FCC, Cyclones, UC, X), to our landmarks (Roebling Bridge, the Museum Center and Zoo, Fountain Square). This is your chance to help us create our own PUG identity. Get your creative juices flowing and visit the below link for additional details and how YOU can help us create the Cincinnati PUG logo. Help create your chapter's logo | Everpure Community1.2KViews0likes2Comments
Pure's Intelligent Control Plane: Powered by AI Copilot, MCP Connectivity and Workflow Orchestration
At Accelerate 2025, we announced two capabilities that change how you manage Pure Storage in your broader infrastructure: AI Copilot with Model Context Protocol (MCP) and Workflow Orchestration with production-ready templates. Here's what they do and why they matter. AI Copilot with MCP: Your Infrastructure, One Conversation The Problem Your infrastructure spans multiple platforms. Pure Storage managing your data, VMware running VMs, OpenShift handling containers, security tools monitoring threats, application platforms tracking performance - each with its own console, APIs, and workflows. When you need to migrate a VM or respond to a security incident, you're manually pulling information from each system, correlating it yourself, then executing actions across platforms. You become the integration layer. The Solution Pure1 now supports Model Context Protocol (MCP), taking Copilot from a suggestive assistant to an active operator. With MCP enabled, Copilot doesn’t just recommend - it acts. It serves as a secure bridge between natural language and your infrastructure, capable of fetching data, executing APIs, and orchestrating workflows across diverse systems. Here’s what makes this powerful: You deploy MCP servers within your environment—one for VMware, another for OpenShift, and others for the systems you use. Each server exposes your environment’s capabilities through a standard, interoperable protocol. Pure Storage AI Copilot connects seamlessly to these MCP servers, as well as to Pure services such as Data Intelligence, Workflow Orchestration, and Portworx Monitoring, enabling unified and secure automation across your hybrid ecosystem. What You Can Connect You can deploy an MCP server on any system whether it’s your VMware environment, Kubernetes clusters, security platforms like CrowdStrike, databases, monitoring tools, or custom applications. Pure Storage AI Copilot connects to these servers under your control, securely combining their data with Pure Storage services to deliver richer insights and automation. Getting Started: If you have a use-case around MCP, please contact your Pure Storage account team. Workflow Orchestration: Deploy in Minutes, Not Months The Problem Building production-grade automation takes months. You need error handling, integration with multiple systems, testing for edge cases, documentation, ongoing maintenance. Most teams end up with half-finished scripts that only one person understands. The Solution We built workflow templates for common operations, tested them at scale, and made them available in Pure1. Install them, customize to your needs, and run them in minutes. Key Templates VMware to OpenShift Migration with Portworx Handles complete migration: extracts VM metadata, identifies backing Pure volumes, checks OpenShift capacity, configures vVols Datastore and DirectAccess, uses array-based replication, converts to Portworx format. Traditional migration takes hours for TB-scale VMs. This takes 20 to 30 minutes. SQL / Oracle Database Clone and Copy Automates cloning and copying of SQL Server and Oracle databases for dev/test or refresh needs. Instantly creates storage-efficient clones from snapshots, mounts them to target environments, and applies Pure-optimized settings. The hours-long manual process becomes a quick, consistent workflow completed in minutes Daily Fleet Health Check Scans all arrays for capacity trends, performance issues, protection gaps, hardware health.Posts summary to Slack. Proactive visibility without manually checking each array. Rubrik Threat Detection Response When Rubrik detects a threat, automatically tags affected Pure volumes, creates isolated immutable snapshots, and notifies the security team. Security events propagate to your storage layer automatically. How It Works Workflow Orchestration is a SaaS feature in Pure1. Deploy lightweight agents (Windows, Linux, or Docker) in your data center to execute workflows locally. Group agents together for high availability and governance controls. Integrations Native Pure Storage: Pure1 Connector for full API access, Fusion Connector for storage provisioning (works for Fusion and non-Fusion FlashArray/FlashBlade customers) Third-Party: ServiceNow, Slack, Google, Microsoft,CrowdStrike, HTTP/Webhooks, Pagerduty, Salesforce and more. The connector library continues expanding. Getting Started: Opt-in now in Pure1 - Workflow. Introductory offer available at this time. Check with your Pure account team if you have questions. How They Work Together At Accelerate 2025 in New York, we showcased this capability in action. Here's the scenario: an organization wants to migrate VMs to Kubernetes. Action-enabled Copilot orchestrates communication with Pure Storage appliances and services as well as third-party MCP servers to collect the required information for addressing a problem across a heterogeneous environment. With Pure1 MCP, AI Copilot, and Workflows, there's now a programmatic way to collect information from OpenShift MCP, VMware MCP, and Pure1 storage insights- then recommend an approach on what VMs to migrate based on your selection criteria. You prompt Copilot: "How can I move my VMs to OpenShift in an efficient way?" Copilot communicates across: Your VMware MCP server - to get VM specifications, current configurations, resource usage Your OpenShift MCP server - to check available cluster capacity, validate compatibility Portworx monitoring - to understand current storage performance Copilot reasons across all this information, identifies ideal VM candidates based on your criteria, and recommends the migration approach- which VMs to move, target configurations, and how to preserve policies. Then it can trigger the migration workflow, keeping you updated throughout the process. Why This Matters Storage Admins: Stop being the bottleneck. Enable self-service while maintaining governance. DevOps Teams: Deploy production-tested automation without writing code. Security Teams: Build automated response workflows spanning detection, isolation, and recovery. Infrastructure Leaders: Reduce operational overhead. Teams focus on strategy, not repetitive tasks. Get Started MCP Integration:If you have a use-case around MCP, please contact your Pure Storage account team.. Workflow Orchestration:Opt-in at Pure1 → Workflows. Learn More: Documentation in Pure1 or contact your Pure Storage account team. Pure1 evolved from a monitoring platform to an Intelligent Control Plane. AI Copilot reasons across your infrastructure. Workflow Orchestration executes. Together, they change how you manage data with Pure Storage.1.1KViews2likes0CommentsPure Certifications
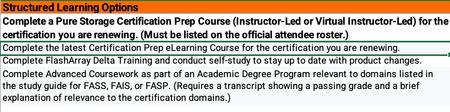
Hey gang, If any of you currently hold a Flash Array certification there is an alternative to retaking the test to renew your cert. The Continuing Pure Education (CPE) program takes into account learning activities and community engagement and contribution hours to renew your FA certification. I just successfully renewed my Flash Array Storage Professional cert by tracking my activities. Below are the details I received from Pure. Customers can earn 1 CPE credit per hour of session attendance at Accelerate, for a maximum of 10 CPEs total (i.e., up to 10 hours of sessions). Sessions must be attended live. I would go ahead and add all the sessions you attended at Accelerate to the CPE_Submission form. Associate-level certifications will auto-renew as long as there is at least one active higher-level certification (e.g., Data Storage Associate will auto-renew anytime a Professional-level cert is renewed). All certifications other than the Data Storage Associate should be renewed separately. At this time, the CPE program only applies to FlashArray-based exams. Non- FA exams may be renewed by retaking the respective test every three years. You should be able to get the CPE submission form from your account team. Once complete email your recertification Log to [email protected] for formal processing.1KViews4likes1CommentDon’t Wait, Innovate: Long‑Life Release 6.9.0 Is Your Gateway to Continuous Innovation
How Pure Releases Work (and Why You Should Care) Pure Storage doesn’t make you choose between stability and innovation: Feature Releases arrive monthly and are supported for 9 months. They’re production‑ready and ideal if you like to live on the cutting edge. Long‑Life Releases (LLRs) bundle those feature releases into a thoroughly tested version which is supported for three years. LLR 6.9.0 is essentially all the innovation of those Feature releases, rolled into one update. This dual approach means you can adopt new features as soon as they’re ready or wait for the next stable release—either way, you keep moving forward. Not sure what features you’re missing? Not a problem as we have a tool for that. A coworker reminded me: Pure1’s AI Copilot can tell you exactly what you’ve been missing. Here’s how easy it is to find out: Log into Pure1, click on the AI Copilot tab, and type your question. My coworker reminded me of this last week, so I tried: “Please provide all features for FlashArray since version 6.4 of Purity OS.” Copilot returned a detailed rundown of new capabilities across each release. In just a couple of minutes, I saw everything I’d overlooked—no digging through release notes or calling support required. A Taste of What You’ve Been Missing Here’s a snapshot of the goodies you may have missed across the last few year releases: Platform enhancements: FlashArray//E platform (6.6.0) extends Pure’s simplicity to tier‑3 workloads. Gen 2 chassis support (6.8.0) delivers more performance and density with better efficiency. 150 TB DirectFlash modules (6.8.2) boost capacity without compromising speed. File services advancements: FlashArray File (GA in 6.8.2) lets you manage block and file workloads from the same array. SMB Continuous Availability shares (6.8.6) keep file services online through failures. Multi‑server/domain support (6.8.7) scales file services across larger environments. Security and protection: Enhanced SafeMode protection (6.4.3) quadruples local snapshot capacity and adds hardware tokens for instant data locking which is vital in a ransomware era. Over‑the‑wire encryption (6.6.7) secures asynchronous replication. Pure Fusion: We can't talk about this enough Think of this as fleet intelligence. Fusion applies your policies across every array and optimizes placement automatically, cutting operational overhead . Purity OS: It’s Not Just Firmware Every Purity OS update adds value to your existing hardware. Recent improvements include support for new NAND sources, “titanium” efficiency power supplies, and advanced diagnostics. These aren’t minor tweaks; they’re part of Pure’s Evergreen promise that your hardware investment keeps getting better over time. Why Waiting Doesn’t Pay Off It’s tempting to delay updates, but with Pure, waiting often means you’re missing out on: Security upgrades that counter new threats. Performance gains like NVMe/TCP support and ActiveCluster improvements. Operational efficiencies such as open metrics and better diagnostics. Future‑proofing features that prepare you for upcoming innovations. Your Roadmap to Capture These Benefits Assess your current state: Use AI Copilot to see exactly what you’d gain by moving to LLR 6.9.0. Plan your update: Pure’s non‑disruptive upgrades let you modernize without downtime. Explore new features: Dive into Fusion, enhanced file services, and expanded security capabilities. Connect with the community: Share experiences with other users to accelerate your learning curve. The Bottom Line Pure’s Evergreen model means your hardware doesn’t just retain value it continues to gain it. Long‑Life Release 6.9.0 is a gateway to innovation. In a world where data is your competitive edge, standing still is equivalent to moving backward. Ready to see what you’ve been missing? Log into Pure1, fire up Copilot, and let it show you the difference between where you are and where you could be.800Views4likes0Comments
Simplifying Observability: Native OpenTelemetry in Purity
As enterprises modernize and accelerate their infrastructure through automation, blind spots become more expensive. When systems move faster, teams need telemetry that’s reliable, portable, and easy to integrate across a heterogeneous stack. Pure Storage’s Enterprise Data Cloud vision reflects that shift: infrastructure that delivers cloud-like simplicity and speed while preserving the control, security, and performance enterprises expect. Fusion supports this by standardizing and scaling self-service workflows, turning storage into an on-demand platform. But faster operations require a stronger feedback loop. As automation increases, teams need confidence that systems remain healthy and predictable. That’s why consolidated observability is foundational. Instead of running separate monitoring tools per layer, organizations are centralizing telemetry into a single observability platform that can correlate signals end-to-end; from the end user’s experience (e.g. browser or mobile app), through the network and application code, all the way down to infrastructure like servers, databases, containers, and storage. This consolidation reduces redundant tools and fragmented dashboards while giving teams the correlated insights they need to resolve incidents faster and make better decisions. The Siloed Vendor Problem Yet achieving this unified vision has proven challenging. Traditional infrastructure vendors have long provided proprietary monitoring tools designed exclusively for their own products. A storage vendor offers one monitoring interface, the compute vendor another, and the network vendor yet another. Each tool uses different data formats, separate dashboards, and incompatible alerting mechanisms. For organizations running heterogeneous environments (which is nearly all of them), this creates an untenable situation. IT teams must context-switch between multiple tools, correlate data manually across platforms, and maintain expertise in numerous vendor-specific interfaces. When an application performance issue arises, determining whether the root cause lies in storage latency, network congestion, or compute resource exhaustion becomes an exercise in detective work across disconnected systems. The promise of consolidated observability cannot be realized with vendor-specific, siloed monitoring tools. A different approach is needed. The Open Standard Solution This challenge has driven the industry toward open, vendor-agnostic standards that enable telemetry interoperability. OpenMetrics emerged as one such standard, providing a common data model for exposing metrics (counters, gauges, and histograms) in a format that any observability platform can consume. By standardizing metric exposition, OpenMetrics reduced vendor lock-in and became foundational to Prometheus-based monitoring at scale. However, standardizing the format of metrics is only one part of what organizations need to make consolidated observability work in practice. Enterprises also need consistency in how telemetry is named, described, transported, and exported, so that infrastructure data can flow cleanly across heterogeneous environments without bespoke integrations. Enter OpenTelemetry, which expands on the same vendor-neutral principles to create a comprehensive observability framework. In other words, it helps ensure telemetry isn’t just emitted in a readable format, but is also structured and delivered in a way that remains portable across vendors and backends. Think of it as establishing the equivalent of a USB standard for telemetry data: any "device" (an application or infrastructure component) can plug into any "peripheral" (an observability platform) without requiring proprietary connectors. The primary benefit is profound: freedom from vendor lock-in. Organizations can choose best-of-breed observability platforms based on capabilities and cost rather than being constrained by what their infrastructure vendors support. The External Agent Bottleneck OpenTelemetry and OpenMetrics have made consolidated observability technically feasible, but most storage vendors have adopted these standards through what can only be described as a "bolt-on" approach. This forces customers to manage a complex chain of external agents, sidecars, or dedicated VMs, just to get telemetry from their platforms visualized onto their dashboards. This presents a problem that’s two-fold: Operational Overhead: Instead of simply consuming data, IT teams are burdened with sizing, patching, and troubleshooting the monitoring infrastructure itself. New Failure Modes: If an agent crashes or becomes misconfigured, visibility into critical infrastructure disappears precisely when it's needed most. Teams find themselves monitoring their monitoring infrastructure; a meta-problem that defeats the original purpose. The Native Integration Imperative In the Pure Storage platform, observability is a first-class capability instead of an afterthought. Thus, Pure Storage has taken a different path: an OpenTelemetry collector embedded into Purity OS. Instead of asking customers to deploy and maintain external agents, exporters, or intermediary infrastructure, Pure Storage platforms will now expose telemetry in standardized OpenTelemetry format as an intrinsic platform capability. The result is sending storage telemetry directly into any OpenTelemetry-compatible Observability platform-of-choice (eg., Datadog, Dynatrace, Splunk, Grafana, etc.). Fig. Numbers represent the sequence of steps in the workflow Pure Storage’s commitment has always been simplicity. Native OpenTelemetry in Purity OS extends that principle to observability: less integration friction, fewer moving parts, and more time spent acting on insight instead of maintaining the pipeline. More information on the native integration of OpenTelemetry Collector within Purity//FB can be found here. Purity//FA to follow soon.700Views0likes0CommentsWho's using Pure Protect?
Hey everyone, Just wondering if anyone else is using Pure Protect yet. We have gone through the quick start guide and have a VMWare to VMWare configuration setup. We have configured our first policy and group utilizing a test VM but it seems to be stuck in the protection phase. I would be very interested to hear what others have seen or experienced. -Charles700Views2likes4CommentsComplexity Creeps. Let’s Audit It Before It Breaks You.
Complexity in IT isn’t built overnight—and it won’t be unwound that way either. This blog walks through a practical, no-fluff approach to auditing and simplifying your IT environment. From building a visibility map of your tools and integrations to prioritizing what to fix, executing cleanly, and proving the value with real metrics—this is about intentional, incremental change. Win big. Choose simplicity.614Views4likes4CommentsNFS over TLS on FlashArray (Purity//FA 6.10.6)
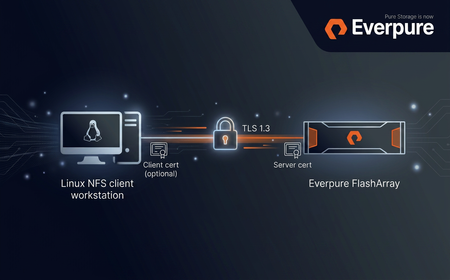
Purity//FA 6.10.6 introduces NFS over TLS for FlashArray File Services: an in-transit encryption layer that wraps NFSv3 and NFSv4.1 RPC traffic in a TLS 1.3 session as defined by RFC 9289 - Towards Remote Procedure Call Encryption By Default. Server authentication is mandatory, and mutual TLS (mTLS) is available as an optional second factor. This post is a technical feature description plus a minimum viable configuration walkthrough. It assumes you are already comfortable with FlashArray File Services (file servers, exports, policies) and Linux NFS clients. What the feature actually is Transport encryption for NFS - NFSv3 and NFSv4.1 RPC traffic is carried inside a TLS 1.3 record layer over TCP/2049. No NFS-level changes; applications and mount paths stay the same. Server authentication - the FlashArray presents an X.509 certificate; the client validates it against its own trust store. Server certificates must include the file-server VIF in the SAN. Optional mTLS - the array can require and verify a client certificate against a configured trusted CA (single certificate or a certificate group). Per-server policy - TLS configuration is a first-class tls policy attached to a specific file server, not a global toggle. End-to-end data path NFS over TLS data path. tlshd on the client performs the TLS handshake against the FlashArray; the resulting session encrypts all consequent NFS traffic on established connection. Building blocks on the FlashArray The feature is exposed as a new tls policy type that ties together three existing concepts: certificates (imported or self-signed), the tls-policy object, and a file server. The policy holds the appliance certificate, the TLS version/cipher constraints, the protocols TLS is enforced for, and (optionally) the trusted CA used to authenticate clients. TLS versions and cipher suites NFS over TLS on FlashArray negotiates TLS 1.3 for the NFS data path. The tls-policy object accepts --minimum-tls-version values of 1.2 or 1.3 , but that minimum is a floor, not a contract - for NFS the negotiated version will always be 1.3. The default TLS 1.3 cipher set is: TLS_AES_256_GCM_SHA384 TLS_CHACHA20_POLY1305_SHA256 TLS_AES_128_GCM_SHA256 (mandatory per RFC 8446) On clients with AES-NI, TLS_AES_256_GCM_SHA384 is the natural choice. TLS_CHACHA20_POLY1305_SHA256 is the cipher to prefer on clients without AES hardware acceleration. NFS protocol versions and mount options Both NFSv3 and NFSv4.1 are supported. The Linux client opts into TLS at mount time via the xprtsec option, mediated by tlshd : Option Meaning xprtsec=tls One-way TLS, server authentication only xprtsec=mtls Mutual TLS - client also presents a certificate vers=4.1 / vers=3 NFS protocol version Prerequisites FlashArray: Purity//FA 6.10.6 or later, with at least one configured file server. Client OS: a recent Linux distribution with NFS-over-TLS support (e.g. Rocky Linux 10), including nfs-utils , tlshd and openssl (for certificate handling). Certificates: a server certificate signed by a CA the client trusts; if there is no proper DNS record set up, the certificate must include the file-server IP Address in its subjectAltName . For mTLS, a client certificate signed by a CA the array trusts. Configuration walkthrough This is the minimum sequence to land an encrypted NFS mount. Replace IPs, names and certificate paths to taste. If you don't yet have a CA to issue the server (and, for mTLS, client) certificate from, see the test-CA appendix at the end of this post. 1. FlashArray - import the appliance certificate # on the FlashArray CLI - interactive paste of key, then certificate purecert imported create nfs-server-cert --key # for mTLS only: import the CA used to sign client certificates purecert imported create nfs-client-ca 2. FlashArray - create a TLS policy Server-auth-only policy: purepolicy tls create nfs-tls-policy \ --appliance-certificate nfs-server-cert \ --tls-enforced-for nfs mTLS variant - require the client to present a certificate and verify it against a trusted CA (the trusted CA argument accepts either a single certificate or a certificate_group ): purepolicy tls create nfs-mtls-policy \ --appliance-certificate nfs-server-cert \ --tls-enforced-for nfs \ --client-certificates-required \ --client-certificate-trust-verify-enabled \ --trusted-client-ca-certificate nfs-client-ca Optional version / cipher tuning: purepolicy tls setattr nfs-tls-policy --minimum-tls-version 1.3 purepolicy tls setattr nfs-tls-policy \ --enabled-tls-ciphers TLS_AES_256_GCM_SHA384,TLS_CHACHA20_POLY1305_SHA256 purepolicy tls list --effective 3. FlashArray - attach the policy to a file server pureserver list purepolicy tls add nfs-tls-policy --server your-file-server purepolicy tls list --member Once the policy is attached, the file server starts requiring TLS for any new NFS connection on that VIF. Existing un-encrypted sessions are not renegotiated or dropped on policy change - clients must remount or restart their NFS service to pick up the new requirements. The same caveat applies when removing or rotating the trusted client CA. 4. FlashArray - create the export (unchanged from regular NFS) purefs create your-filesystem puredir create your-filesystem:your-managed-dir purepolicy nfs create your-nfs-policy purepolicy nfs rule add your-nfs-policy \ --client "*" --no-root-squash --rw --version nfsv3,nfsv4 puredir export create your-export \ --dir your-filesystem:your-managed-dir \ --policy your-nfs-policy \ --server your-file-server The export must live on the same file server that the TLS policy is attached to (note the --server argument). 5. Linux client - install and configure tlshd dnf install -y nfs-utils ktls-utils systemctl enable --now tlshd mkdir -p /etc/pki/nfs cp ca.crt /etc/pki/nfs/ca.crt chmod 644 /etc/pki/nfs/ca.crt Minimal /etc/tlshd.conf for server-only TLS: [debug] loglevel=1 tls=1 nl=0 [authenticate] [authenticate.client] x509.truststore=/etc/pki/nfs/ca.crt [authenticate.server] For mTLS, add the client identity: [authenticate.client] x509.certificate=/etc/pki/nfs/client.crt x509.private_key=/etc/pki/nfs/client.key x509.truststore=/etc/pki/nfs/ca.crt Restart tlshd after any change: systemctl restart tlshd . 6. Mount # server authentication only mount -t nfs -o vers=4.1,xprtsec=tls,rw \ 10.0.0.100:/your-export /mnt/nfs-tls # mutual TLS mount -t nfs -o vers=4.1,xprtsec=mtls,rw \ 10.0.0.100:/your-export /mnt/nfs-mtls # verify mount | grep xprtsec What the wire actually looks like Connection bring-up: AUTH_TLS probe per RFC 9289 → TLS 1.3 handshake brokered by tlshd → encrypted NFS traffic on the same TCP connection. Operational notes Policy changes are not retroactive. Tightening a policy (turning TLS on, switching to mTLS, removing a cipher in use) does not drop or renegotiate existing connections. Affected clients need to remount or restart NFS. Same applies to CA removal/expiry. Server certificate must carry the VIF in SAN. Without a matching subjectAltName entry the client refuses the certificate; common symptom is a mount failure with Protocol not supported and tlshd logging a verification error. NFSv4.1 connection reuse amortises the handshake cost across many operations; NFSv3 mounts re-do the handshake more often, so the relative cost is higher on connection churn. Troubleshooting cheat sheet Symptom Likely cause First thing to check mount.nfs: Connection refused Policy enforces TLS, client mounts plain NFS, or tlshd not running systemctl status tlshd ; add xprtsec=tls access denied by server while mounting mTLS client cert missing/untrusted, or export rule mismatch journalctl -u tlshd -n 100 ; puredir export list Protocol not supported Server certificate SAN does not include the mounted IP, or CA not trusted openssl x509 -in server.crt -text -noout | grep -A1 "Subject Alternative Name" Useful diagnostics on the client: journalctl -u tlshd -f sysctl -w sunrpc.rpc_debug=0x7fff sunrpc.nfs_debug=0x7fff tcpdump -i any -nn -v 'host <file-server-ip> and port 2049' -w /tmp/nfs-tls.pcap # remember to restore: sysctl -w sunrpc.rpc_debug=0 sunrpc.nfs_debug=0 Appendix: a throwaway CA for testing For lab and PoC work it is much more useful to stand up a tiny local CA than to hand out self-signed certs. The workflow mirrors what you would do with a real PKI - the array trusts a CA, that CA signs the appliance certificate, and (for mTLS) the same or a different CA signs each client certificate. Anything below is for non-production use; do not reuse these keys anywhere you care about. Set a couple of variables to keep the commands short: mkdir -p ~/nfs-tls-ca && cd ~/nfs-tls-ca VIP=10.0.0.100 # file-server VIP the client will mount FQDN=nfs.lab.example.com # optional DNS name for the same VIP CLIENT_CN=client01.lab.example.com # only needed for mTLS 1. Root CA # 4096-bit RSA root, valid 10 years openssl genrsa -out ca.key 4096 openssl req -x509 -new -nodes -key ca.key -sha256 -days 3650 \ -subj "/CN=NFS-TLS Lab Root CA/O=Lab" \ -out ca.crt # inspect openssl x509 -in ca.crt -noout -subject -issuer -dates 2. Appliance (server) certificate The server certificate must include the file-server VIP in subjectAltName ; without it the client refuses the certificate during handshake. Add the FQDN as well if you have DNS for it. openssl genrsa -out server.key 2048 openssl req -new -key server.key \ -subj "/CN=${FQDN}/O=Lab" \ -addext "subjectAltName=DNS:${FQDN},IP:${VIP}" \ -out server.csr cat > server.ext <<EOF basicConstraints = CA:FALSE keyUsage = digitalSignature, keyEncipherment extendedKeyUsage = serverAuth subjectAltName = DNS:${FQDN},IP:${VIP} EOF openssl x509 -req -in server.csr -CA ca.crt -CAkey ca.key -CAcreateserial \ -out server.crt -days 825 -sha256 -extfile server.ext # verify the chain and the SAN openssl verify -CAfile ca.crt server.crt openssl x509 -in server.crt -noout -ext subjectAltName Import this pair into the FlashArray as nfs-server-cert and reference it from the TLS policy as --appliance-certificate : # key first, then certificate, when prompted purecert imported create nfs-server-cert --key 3. Client certificate (mTLS only) openssl genrsa -out client.key 2048 openssl req -new -key client.key \ -subj "/CN=${CLIENT_CN}/O=Lab" \ -out client.csr cat > client.ext <<EOF basicConstraints = CA:FALSE keyUsage = digitalSignature extendedKeyUsage = clientAuth EOF openssl x509 -req -in client.csr -CA ca.crt -CAkey ca.key -CAcreateserial \ -out client.crt -days 825 -sha256 -extfile client.ext openssl verify -CAfile ca.crt client.crt 4. What goes where File Goes to Used as server.key + server.crt FlashArray ( purecert imported create nfs-server-cert ) TLS policy --appliance-certificate ca.crt (for mTLS) FlashArray ( purecert imported create nfs-client-ca ) TLS policy --trusted-client-ca-certificate ca.crt NFS client ( /etc/pki/nfs/ca.crt ) tlshd truststore ( x509.truststore ) client.key + client.crt (for mTLS) NFS client ( /etc/pki/nfs/ ) tlshd client identity ( x509.private_key , x509.certificate ) From here, finish with the Configuration walkthrough steps above: create the TLS policy, attach it to the file server, create the export, configure tlshd , mount with xprtsec=tls or xprtsec=mtls . References RFC 9289 - Towards Remote Procedure Call Encryption By Default RFC 8446 - TLS 1.3 tlshd(8) and tlshd.conf(5) manual pages Everpure FlashArray File Services administration guide (Purity//FA 6.10.6)500Views1like0Comments